Page index
NOCLook Cookbook
Don't be afraid to try these recipes out on nidev-consumer.nordu.net, if anything breaks it needs to get fixed.
Optical Service creation
The sequence for creating a new optical patch, seen from a documentation POI:
- Consult DWDM planning drawing to find free slot in nodes
- Consult channel planning sheet to find free channel
- Onsite work: required patch cables are labeled according to "Michael/Bergroths rules"
Patch ID's are put into editgrid, reference is made only to physical objects; port names, ODF, rack ID etc.
These steps are the same as before but hopefully we can move the patch documentation to the network inventory.
Obtain a new Link ID (NU-1xxxxxx) for both ends and document the links
In the left menu click Create new and choose NORDUnet Optical Link from the following page.
- Fill out the form and click Save. You will be sent to the newly created Link.
- Click Edit and on the following page:
- Set Provider to NORDUnet.
- Under Link depends on you can add what the link depends on. You should select a port.
- In the first box select the correct site.
- In the second box select correct rack or equipment.
- In the following box select the correct port.
- Do the same for a second port if necessary.
- Click Save at the bottom of the page.
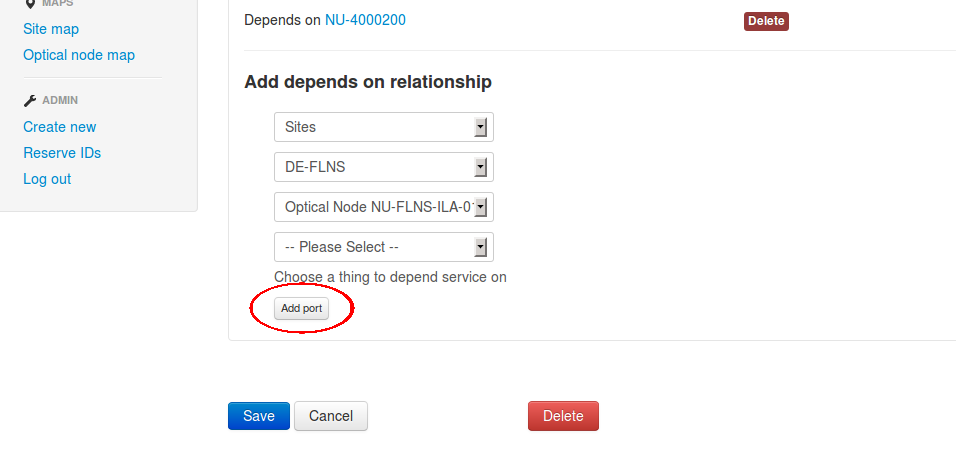
If the port is not documented at the time of link creation you can click the button labeled Add port.
Obtain new Path ID (NU-4xxxxxx) and document the path
In the left menu click Create new and choose NORDUnet Optical Path from the following page.
- Fill out the form and click Save. You will be sent to the newly created path.
- Click Edit and on the following page:
- Set Provider to NORDUnet.
- Under Path depends on you can add the multiplex section this path depends on. Do not forget to add the OPS link(s) that the path depends on.
(You should later be able to select more than one link at the time) - Click Save.
Obtain a new Service ID (NU-Sxxxxxx) and document the service
In the left menu click Create new and choose NORDUnet Service from the following page.
- Fill out the form and click Save. You will be sent to the newly created Link.
- Click Edit and on the following page:
- Set Provider to NORDUnet.
- Set Customer and End User. Customer is the organization paying for the service, end user is the actual user that the NOC might be in contact with.
- Under Service depends on you can add the path and external service the service depends on.
(You should later be able to select more than one dependency at the time) - Click Save.
Site and Patch documentation
Creating a site
Start by creating a site if it does not already exist.
- In the left menu click Create new and choose Site
- Fill out the form and click Save. You will be sent to the newly created Site.
Creating racks
- In the left menu click Create new and choose Rack.
- Fill out the form and click Save. You will be sent to the newly created Rack.
Racks should be named as they are named in the documentation you are reading from or using the site tile space standard (X.X).
Adding equipment to the racks
- Go to the equipment using the search bar or using the menu.
- If the equipment does not exist add a
Unknown macro: {new equipment|#externalequipmentandodf}.
- If the equipment does not exist add a
- Click Edit and then click the Location area.
- Use the drop downs to navigate to the correct rack and click save.
It does not matter if the equipment already has a location set, a new location will replace it.
Adding new External Equipment or ODF
- In the left menu click Create new and choose External Equipment or ODF.
Add a missing port
Make sure that the equipment you want to add a port to is the last selected thing in the drop down list, see image below.
The Add port button will open a new browser window where you should write the port name and set it's type.
The port name should be in the Alcatel-Lucent format for Optical Nodes, rXsrXslX/port#X and in Juniper format for routers aeX, ge-X/X/X, so-X/X/X, ....
Click Save and you can close the window.
To be able to select the newly created port please choose another equipment in the drop down-list and reselect the one you want to reload it's ports. (This will be fixed...)
Please give me a call or send me an e-mail if you find that you want to make a port in something that is not mentioned above. (lundberg@nordu.net)